Salt & Vinegar Roasted Chickpeas

Chickpeas aren't just for hummus anymore. When roasted they turn into a crunchy golden delight. They remind of Miss Vickie's Sea Salt & Vinegar kettle cooked potato chips, way back in the day when I used to eat them. But these roasted chickepeas are very high in fiber, with 6 grams of protein in every 1/2 cup. They're also nice and low in fat department.

These Salt & Vinegar Roasted Chickpeas are one of my favourite things ever. Besides they're amazing flavour and texture, they're packed with so much goodness that they're supper filling. They're also portable and versatile. There really are no rules, you can:

  • Eat them out of your hand.
  • On salads (perfect for added protein).
  • Sprinkled as a garnish on top of soups.
  • Stir them into quinoa or pasta dishes.

...And one of my personal faves, crushing them up and using the crumbs as breading for various things. Roll with what works for you.

Salt & Vinegar Roasted Chickpeas-4.jpg
Salt & Vinegar Roasted Chickpeas.jpg

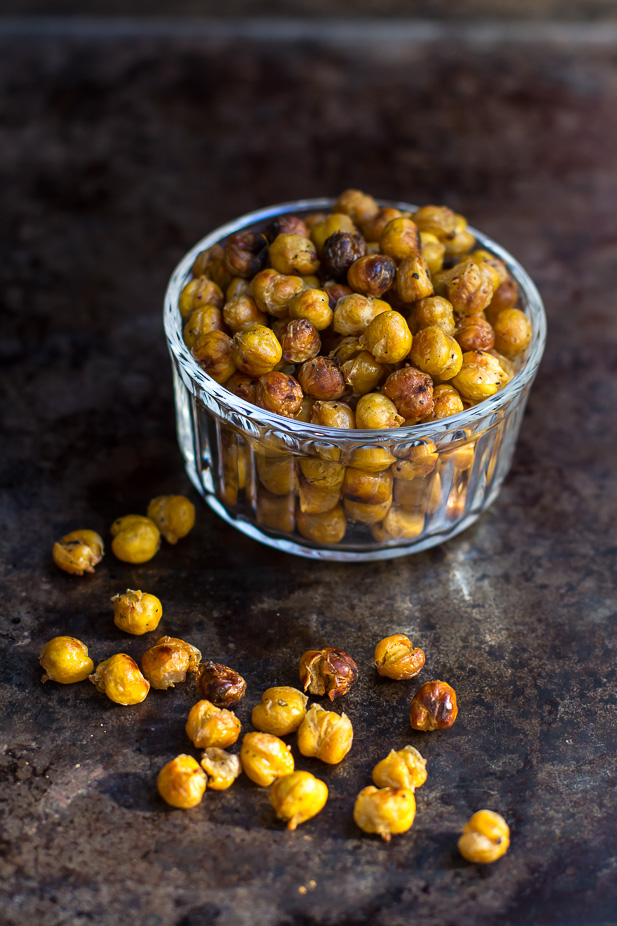
For this recipe I recommend you buy the no-salt added variety of canned chickpeas. This way you can actually control the amount that goes into them yourself. If you prefer a less crunchy chickpea just roast them for less time and check for doneness.

Salt & Vinegar Roasted Chickpeas | ediblesoundbites.com #vegan #cleaneating

Salt & Vinegar Roasted Chickpeas

Cook Time: 25-30 minutes

Yeilds: 1.5 cups

Ingredients

  • 1 1/2 cups (one 14oz can) cooked unsalted chickpeas, drained and rinsed
  • 2-3 cups white vinegar
  • 2 teaspoons olive oil
  • 1/2 teaspoon sea salt
  • fresh ground black pepper, to taste

Instructions

Line a baking sheet with parchment paper and preheat oven to 400F.

Add chickpeas into pot and add just enough vinegar to cover. Place the lid on the pot and bring to the beginning of a boil; remove from heat. Remove the lid from the pot and let the chickpeas sit for 15-20 minutes, uncovered.

Drain chickpeas in a strainer, discarding vinegar. Return to pot and drizzle with olive oil, sea salt and ground pepper to taste. Gently shake and toss until fully coated. Place chickpeas on lined baking sheet. Roast for 25-30 minutes, stirring once half way through. Keep your eye on them about halfway through cooking to make sure they don't burn.

Remove from oven and let cool on baking sheet. They will crisp up as they cool, so don't be too quick to put them away for storing.

My Favourite Homemade Hummus

Homemade Hummus Recipe | via ediblesoundbites.com

I've had hummus on the brain for a while now. It's a healthy, delicious dip that whips together in no time. Personally I think homemade just tastes so much better when comapared to the store bought variety. Plus you can control exactly what goes into your hummus and I like having control of how much salt goes into my recipes. I mean have you ever read the nutrition label or ingredient list on some of the store bought ones before? So much sodium! And you'll notice that many of them include unhealthy oils in their ingredients...like canola oil. Yes it's low in saturated fats, but it's a genetically modified product that is highly refined and bleached using unsafe chemicals. It is certainly not a natural product. The body does not know how to digest such a thing. Anyways, I avoid canola oil like the plague.

Homemade Hummus Recipe | via ediblesoundbites.com

Chickepeas are rich in protein, fiber, and Vitamin C. They also have a good dose of potassium and iron. Just one cup of canned unsalted chickpeas that has 11 grams of protein and 7 grams of fiber. Not that I suggest you sit down and eat a whole cup. He he.

Ok let's get back to that recipe.

I'm going to show you a neat little trick to help get your hummus nice and smooth. I like to start by whipping the tahini (sesame seed paste) with the lemon juice in a food processor until it's light and creamy, which takes about a minute or so. This really makes for a smooth hummus. From here you can then add the rest of the ingredients in and puree. Serve with a drizzle of olive oil on top and maybe a sprinkle of paprika and you've got yourself a great appetizer.

Homemade Hummus Recipe | via ediblesoundbites.com

I'm adding this to my weekly meal plan as a dip for fresh cut veggies (cucumbers are my fave!). What a great snack!

So what's the low-down on this hummus?

  • It's so very easy to make
  • Very tasty
  • Very healthy
  • Makes a convenient snack to add to your lunch box
  • It's high in fiber + protein

Hummus is always a welcome addition to my lunch box.

My Favourite Hummus

by Jennifer Trennum

Keywords: food processor appetizer dips, spreads snack gluten-free grain-free low-carb vegan vegetarian nut-free soy-free chickpeas

Ingredients (2 cups)

  • 1 19 ounce can unsalted chickpeas, drained and rinsed (I used PC's blue menu canned chickpeas)
  • 1/3 cup tahini (sesame paste)
  • 1/4 cup fresh lemon juice (approx. 2 lemons)
  • 1/4 - 1/2 tsp sea salt
  • 2 tbsp water
  • 2 cloves garlic
  • 1 tsp sweet chili sauce
  • paprika for garnish
  • a splash of olive oil

Instructions

In the bowl of your food processor, combine the tahini and lemon juice; process until creamy and whipped, about 1 minute. This helps make the end result nice and smooth.

Next, toss the drained chickpeas into your food processor along with the sea salt, garlic cloves, water, and sweet chili sauce. Purée until smooth and creamy.

Serve in a in bowl with a splash of olive oil and a sprinkle of paprika on top.

To Store

Keep hummus in an airtight container and refrigerate up to one week.

Notes

Start with 1/4 teaspoon of sea salt and taste/season as you go.

Nutritional Analysis

Nutrients per 2 tbsp: 65, Total Fat: 3g, Cholesterol: 0mg, Sodium: 30mg, Carbohydrates: 7g, Fiber: 3g, Sugar: 0g, Protein: 3g

Powered by Recipage
Homemade Hummus Recipe | via ediblesoundbites.com